|
|
|
|
The What / Why / Where / When and Project Ideas
|
Why: To give you an opportunity to learn about something that instersts you, but that you might not otherwise take the time to delve into. To broaden your education as a musician -- if you don't know anything about the music you are playing except where to put your fingers, you will never really appreciate the music or understand it in any kind of intellectual / emotional way. Where/When: Most of these mini-projects are intended to be done in workshop time and should take about 30-60 minutes or so. You may do them at home and the time counts as part of your practice time. What: Almost anything!! There are some suggestions below, but you might have a better idea for a project you are really interested in. If it is a big project, you can use it for more than one term's mini-project. Talk to me about your proposal and how you think it should be evaluated (see generic rubric grading sheet). Some things you can do:
In a way, the mini-projects are optional, but you will not get an A or A- term grade if it is not done & done well. |
|
|
Step 1 - Decide what you are interested in learning about:
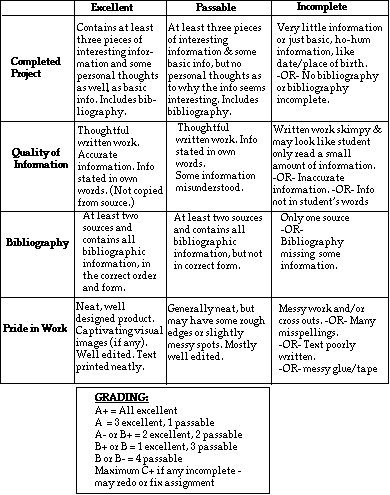
Step 2 - Draw a web or some other kind of graphic organizer & write down everything you already know. Step 3 - Make a list of things you don't know. Step 4 - List any sources for information that you know right off the top of your head. Step 5 - Where can you look or who can you ask about more sources (you need at least two) Step 6 - Find your sources, read (or listen or watch), and add information to your web or graphic organizer - use a different color so you remember what you already knew versus what you just learned. Step 7 - Do your bibliography NOW while you have the book or source in hand & you have your information. It is a real pain to have to go back and find it!!! Step 8 - In what format are you going to present what you have learned? A poster, a mini-bio, a collage, a review or article for our WMS newspaper, a "radio" review that you record and pass in, etc. Step 9 - BEFORE you start creating your project, read the rubric for grading. Make sure you know what an excellent project will look like, and then read the incomplete column so you have an idea of common pit-falls. (Each project has its own rubric. If your idea doesn't have a rubric attached to the directions, use the generic rubric below.) Step 10 - Create your project Step 11 - Proof your project and go over it with the grading rubric. See if you included everything in the excellent column and check for the pit-falls in the incomplete column. Take pride in your work, it is a reflection of YOU! Step 12 - Make sure your name is on your project, attach the bibliography and turn in your work! |
|
 |
|
|
Visit the Wayland Public Schools site http://www.wayland.k12.ma.us |
|||
|
|||
|
|||
|
|||
|
|||
|
|
|||
07/20/2004
